You can change these to any foreign nameservers, such as the nameservers provided by your hosting provider. Please note that **only already registered nameservers in the respective registry** can be added.
##### ##### 5. You can switch back to Joker NS at any time: 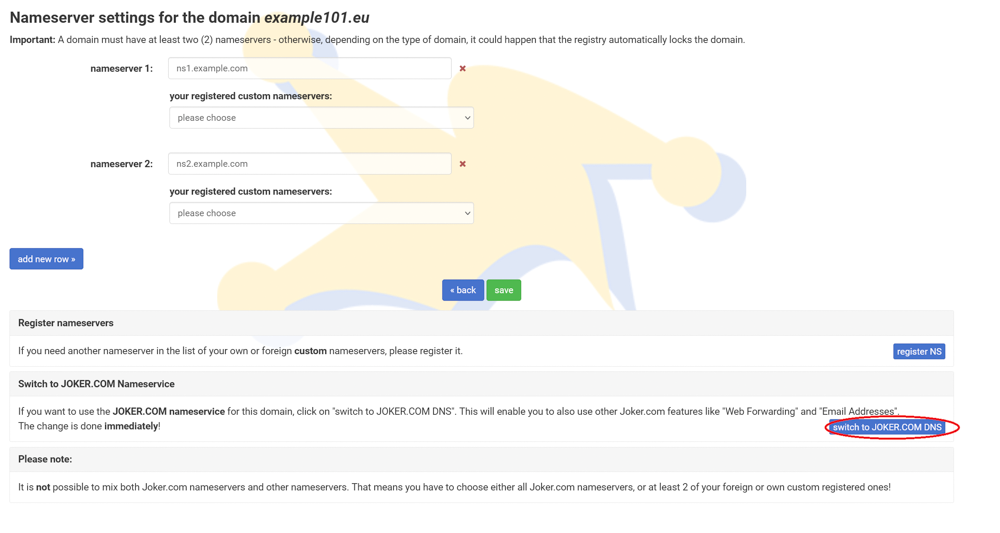 # Creating and Modifying Your Own Nameservers If you prefer not to use the free Joker.com name service and instead want to use your own nameservers, you need to "register" it.**Please note:** Creating nameservers (e.g., registering a hostname with an IP address to define a nameserver) **only works** with Joker.com if the domain used for these nameservers is **also a Joker.com domain**. This limitation is based on technical/registry constraints.
If you intend to use a domain from another registrar, only that registrar will be able to register the nameservers with the registry. To register your own nameservers, please follow these steps: ##### 1. Choose "Nameservers" from the "My Joker" menu: 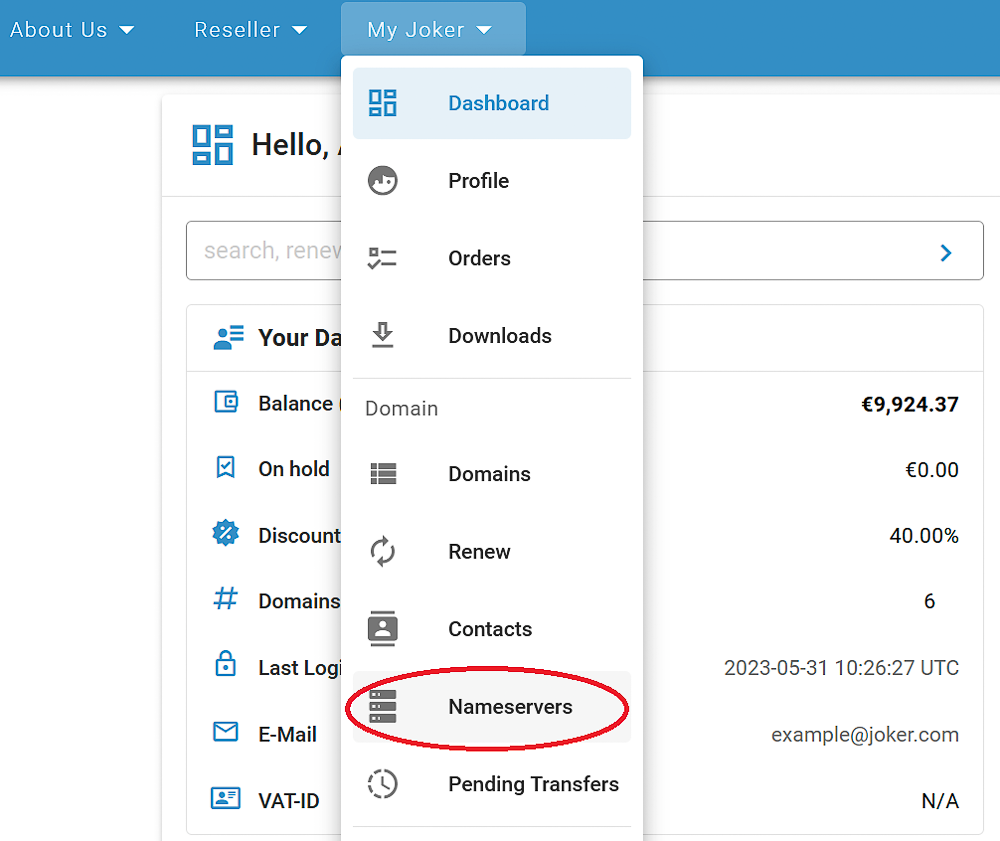 ##### 2. Click on the "Nameserver" button: 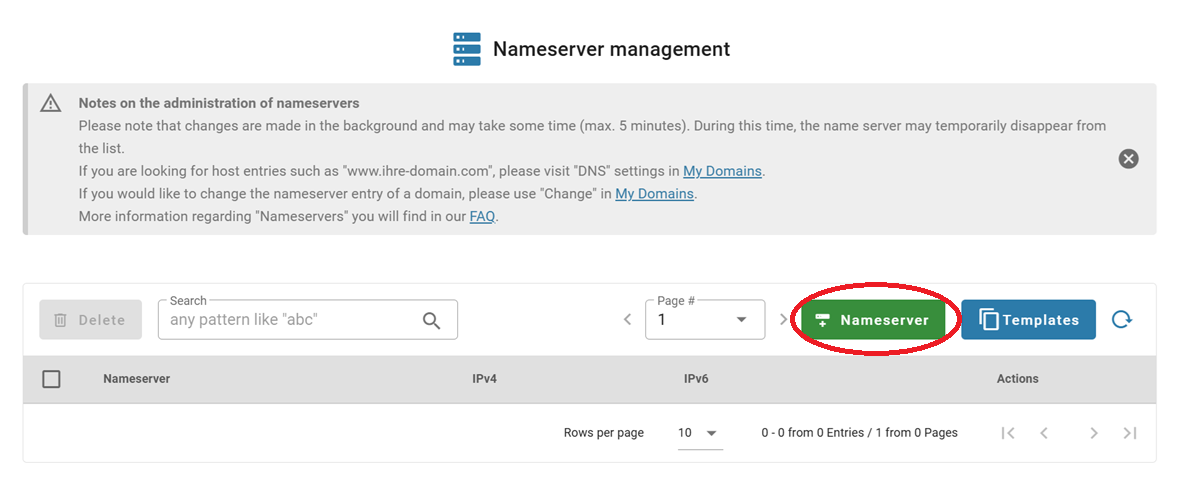 ##### 2. Add the host name and IP addresses, save them, and click on the "Save" button when it becomes active: 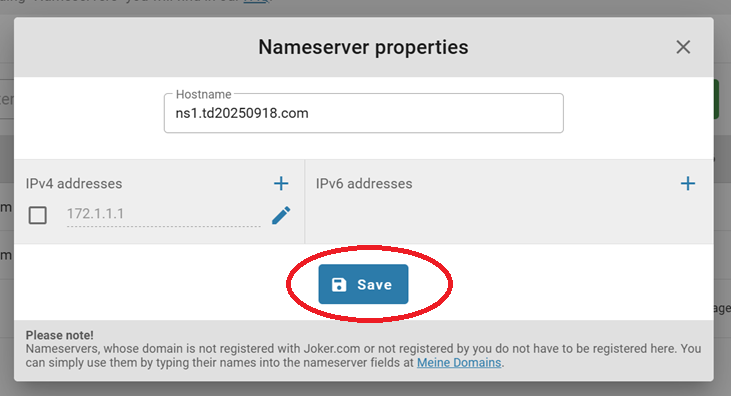 You're done! ### Modifying Your Own Nameservers If you want to modify the Nameserver you have previously created, you need to follow these steps: ##### 1. Choose "Nameservers" from the "My Joker" menu:  ##### 2. Search for the Nameserver you would like to modify, and click the "Edit" icon: 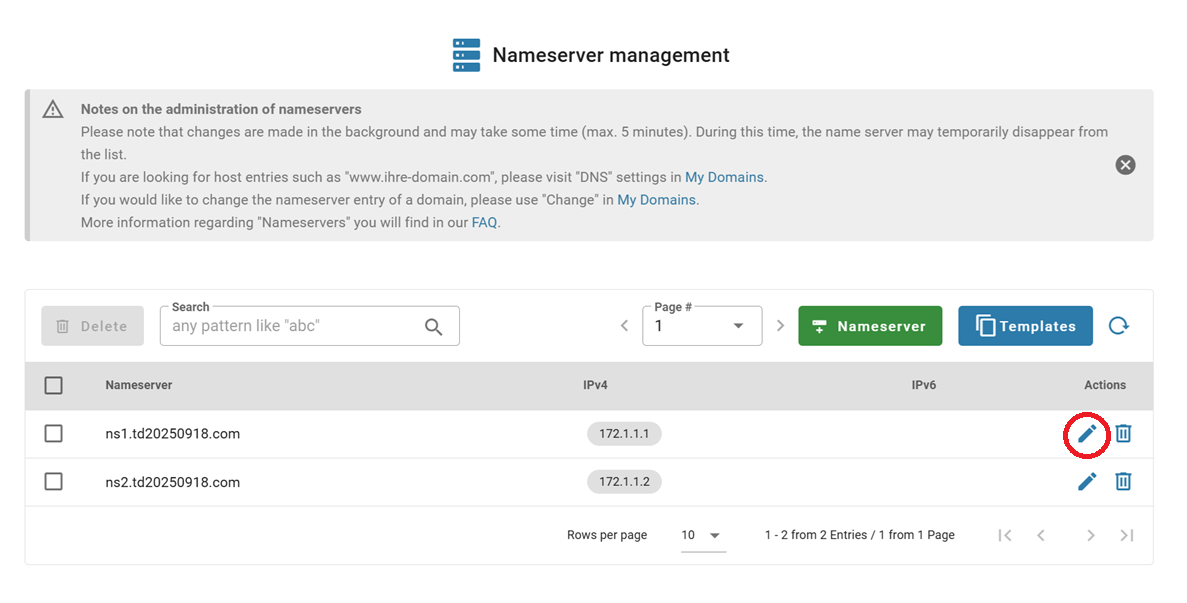 ##### 3. Make necessary changes, save them, then click "Save" after it activates: 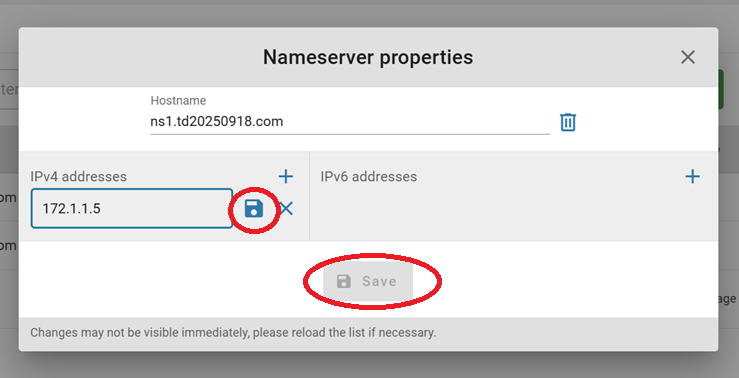 After a successful change, you will receive a confirmation email. ### Deleting Your Nameservers If you want to delete one of your previously registered Nameservers, you can do this easily by following the steps below: ##### 1. Choose "Nameservers" from the "My Joker" menu:  ##### 2. Either click on the "Delete" icon next to the nameserver you want to delete, or select multiple and click the "Delete" button: 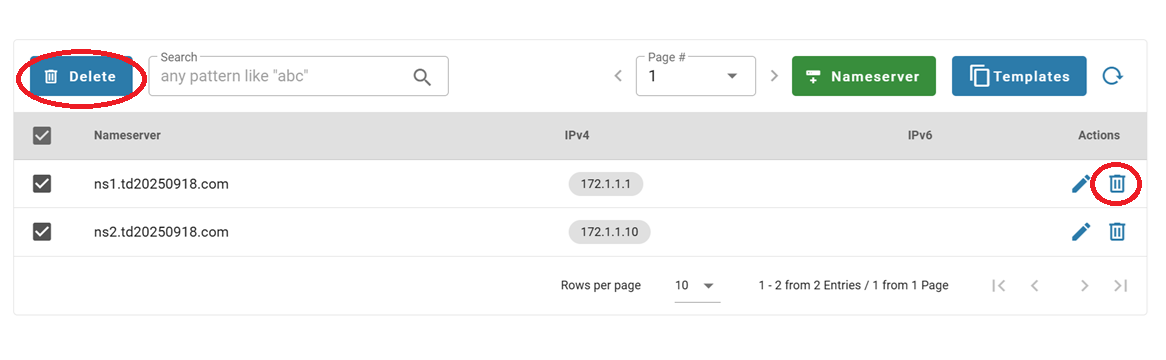**Please note:** Only Nameservers that are **not linked** to any domain (even if they are in the RGP) can be deleted. If the selected name server is still in use, it cannot be deleted.
# Nameserver Templates A familiar **reseller feature** is now available at the Joker.com interface. ### Create Nameserver Templates in Joker.com While nameserver templates have long existed in Rpanel, you can now **create and manage nameserver templates directly in the Joker.com interface** as well. - A **default template** based on **Joker nameservers** is provided. - You can create **custom templates** using your own nameservers or external ones. - Templates help streamline domain setup, reduce configuration errors, and speed up onboarding of new domains. This improvement brings both interfaces in sync and ensures more flexible workflow options for our resellers. ##### To access the templates: 1\. Go to the "Nameservers" section under the "My Joker" menu and click on the "Templates" button: 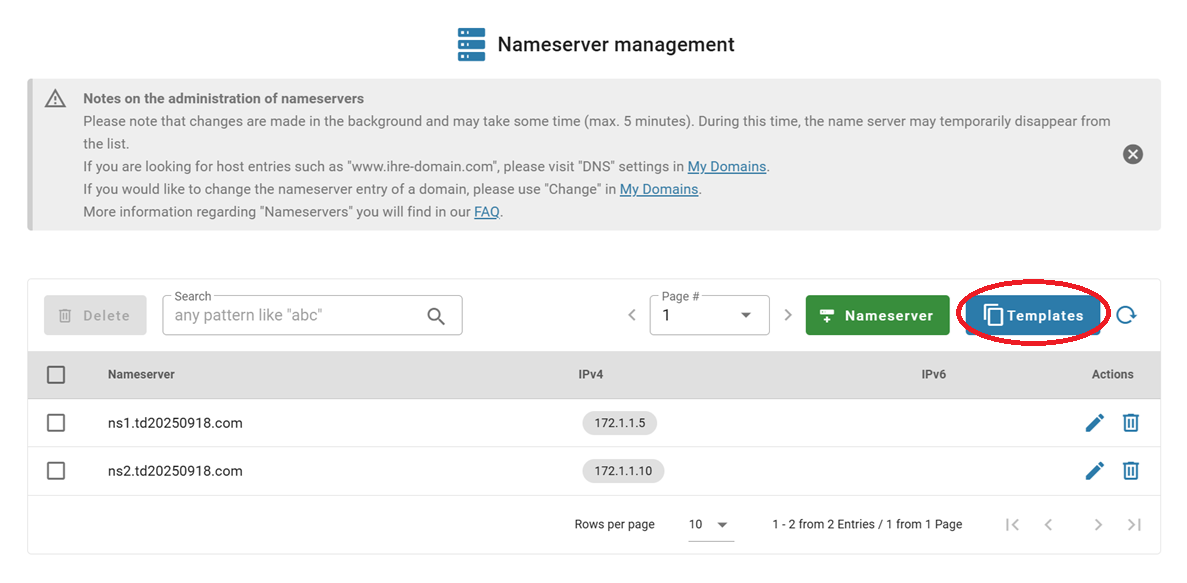 2\. You can edit an existing template by clicking on the "Edit" symbol, or create a new one by clicking on the "Template" button: 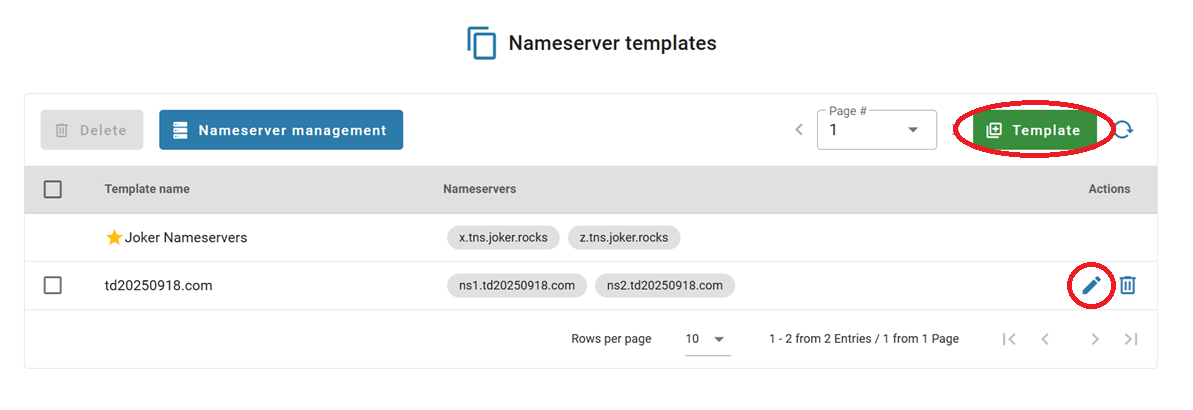 3\. In the pop-up menu, you can create a template using your own, registered at Joker.com, nameservers, by choosing them from the list: 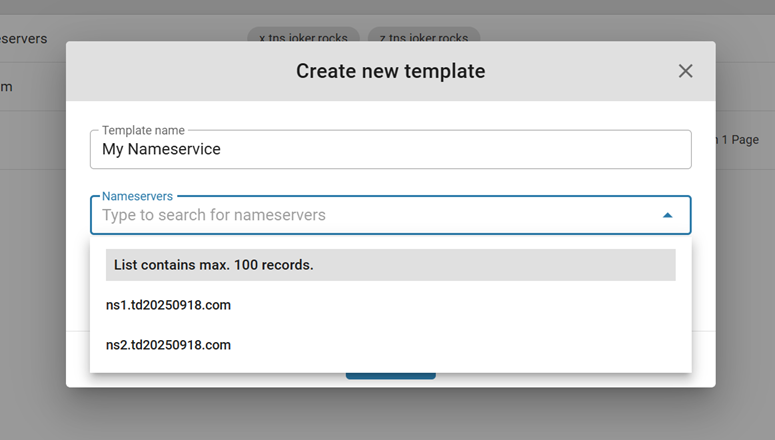 4\. Or add external nameservers for your template manually: 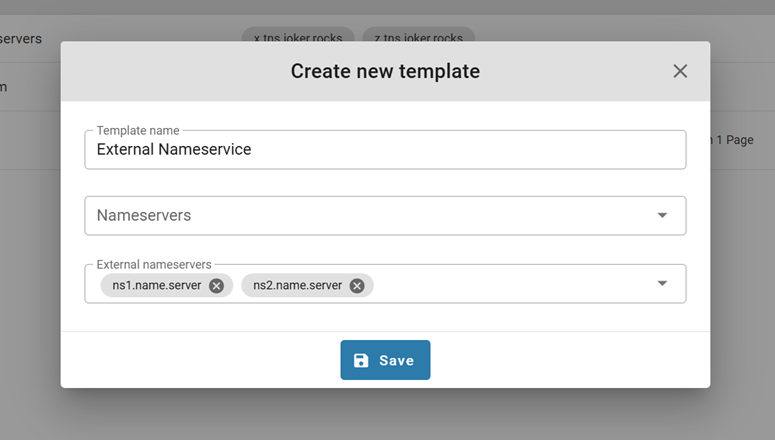 5\. Click "Save", and you're done! # DNS Records Supported by Joker.com Nameservice Overview of supported records and brief explanations. You can enter these records for your domain by accessing the "DNS" menu item in the domain list on Joker.com.| ##### **Supported Records** | |
| **URL Forwarding** | Redirects your domain to an external website (URL). For more information, refer to [this article](https://joker.com/faq/books/jokercom-faq-en/page/url-forwarding-and-e-mail-forwarding) on how to use the web/URL forwarding feature of Joker.com |
| **Email Forwarding** | Creates email addresses for your domain, forwarding emails to your existing external mail account. Learn how to configure email forwarding in the provided [guide](https://joker.com/faq/books/jokercom-faq-en/page/url-forwarding-and-e-mail-forwarding#bkmrk-email-forwarding) |
| **A** | Binds your domain or hosts within the domain to an **IPv4** address. Allows you to create entries like 'www.your-domain.com' that point to an external IP address. |
| **DYNA** | Part of the [Dynamic DNS Service](https://joker.com/faq/books/jokercom-faq-en/page/dynamic-dns-dyndns) - associates your domain or host with your provider's temporary IP address. The IP can be automatically updated using your router device or a client program. Make sure [Dynamic DNS (DynDNS)](https://joker.com/faq/books/jokercom-faq-en/page/dynamic-dns-dyndns) is enabled for your domain. |
| **MX** | Specifies the email server responsible for accepting emails for your domain. Additional details about MX records can be found [here](https://en.wikipedia.org/wiki/MX_Resource_Record). |
| **AAAA** | Associates your domain or host within the domain with an **IPv6** address. |
| **DYNAAAA** | Part of the [Dynamic DNS Service](https://joker.com/faq/books/jokercom-faq-en/page/dynamic-dns-dyndns) - associates your domain or host with your provider's temporary IPv6 address. The IP can be automatically updated using your router device or a client program. Ensure that [Dynamic DNS (DynDNS)](https://joker.com/faq/books/jokercom-faq-en/page/dynamic-dns-dyndns) is enabled for your domain. |
| **CNAME** | Maps your domain or hostname to another domain or hostname. This is useful for creating aliases such as *'www.your-domain.com'* and *'blog.your-domain.com'*, alongside an A record for *your-domain.com*. More information about CNAME records can be found [here](https://en.wikipedia.org/wiki/CNAME_record). |
| **ALIAS** | Somehow similar to CNAME, it allows to ALIAS can also be applied to the domain itself. Note that ALIAS records are not compatible with DNSSEC. More information can be found [here](https://en.wikipedia.org/wiki/CNAME_record#ANAME_record). |
| **DNAME** | Similar to CNAME, but DNAME applies to all subordinate hosts (subdomains) of an entry. Additional details about DNAME records can be found[ here](https://en.wikipedia.org/wiki/CNAME_record#DNAME_record). |
| **SPF** | [Sender Policy Framework](https://en.wikipedia.org/wiki/Sender_Policy_Framework) - used to detect email spoofing and prevent spam. There are various free online SPF record creators available, such as the one found [here](https://www.spf-record.com/generator). Please see below, how to define an SPF record. |
| **TXT** | Creates a TXT record for handling specific tasks, including requesting [***Let's Encrypt SSL***](https://joker.com/faq/books/jokercom-faq-en/page/lets-encrypt-ssl-certificates) certificates. See [here](https://en.wikipedia.org/wiki/TXT_record) for more information about TXT records. |
| **SRV** | Specifies the location of server(s) for a specific protocol and domain. More details about SRV records can be found[ here](https://en.wikipedia.org/wiki/SRV_record). |
| **NAPTR** | Specifies a regular expression-based rewrite rule that generates a new domain label or URI when applied to an existing string. Refer to [this resource](https://en.wikipedia.org/wiki/NAPTR_record) for additional information on NAPTR records. |
| **NS** | Specifies the responsible nameserver for a subdomain and is not allowed at top-level. More details about NS records can be found [here](https://support.dnsimple.com/articles/ns-record/). |
| **CAA** | Allows you to specify which Certification Authority (CA) is permitted to issue SSL certificates for your domain or hostname. See [here](https://en.wikipedia.org/wiki/DNS_Certification_Authority_Authorization) for more information about CAA records. |
| **TLSA** | Validates certificates used for DNS-based Authentication of Named Entities (DANE). Additional details about TLSA records can be found [here](https://en.wikipedia.org/wiki/DNS-based_Authentication_of_Named_Entities). |
| **SSHFP** | Specifies SSH fingerprints served by DNS. Refer to [this resource](https://en.wikipedia.org/wiki/SSHFP_record) for more information on SSHFP records. |
| **SMIMEA** | Secures SMIME (Secure/Multipurpose Internet Mail Extensions) with certificates. More information about SMIMEA records can be found [here](https://www.cloudns.net/wiki/article/386/). |
| **SVCB** | Create a link to any service. Further details can be found here: [SVCB DNS record](https://www.domaintools.com/resources/blog/the-use-cases-and-benefits-of-svcb-and-https-dns-record-types/ "SVCB Record"). |
| **HTTPS** | Create a link to a HTTP service. Further details can be found here: [HTTPS DNS Record](https://de.wikipedia.org/wiki/HTTPS_Resource_Record "HTTPS Record"). |
| example.com | TXT "v=spf1 include:\_spf.google.com ~all" |
| spf1.example.com | TXT "v=spf1 include:\_spf.joker.com ~all" |
| example.com | TXT "v=spf1 include:\_spf.google.com ~all" |
| example.com | TXT "v=spf1 include:\_spf.joker.com ~all" |
**Important:** wait for DNS Propagation. After adding the SPF and DKIM records, **it may take up to 48 hours** for the changes to propagate across the internet. Once the records have propagated, the SPF and DKIM authentication should be active for your domain's email.
# URL Forwarding and E-mail Forwarding Joker.com offers a service that allows you to direct all web requests **(HTTP)** for a domain or subdomain registered with Joker.com to a different externally hosted domain. For example, you can point the web traffic of your domain to the webspace provided by your Internet service provider.This feature lets you access your domain: ***http://www.your-domain.com*** while the actual content is hosted at: ***http://www.your-internet-service-provider.com/your Account***
By default, the redirection is of the type '**HTTP/1.1 301 Moved Permanently**'. This can be changed in the options of the DNS editor ("Type of redirection"). '**TLS**' can also be activated in the options - this enables **encrypted access via https** to your forwarding. A suitable SSL certificate is then automatically generated the first time it is called up, which takes a few seconds. You have the option to use a standard redirection or a **"frame-based"** redirection that keeps the **original domain name visible** in your browser's location bar. Moreover, you can customize your URL forwards with your own special title, meta, or HTTP header tags.**Please note:** only HTTP(S) requests can be forwarded using URL Forwarding
### To configure your URL forwarding, follow these steps: ##### 1. Switch to our Nameservers Check [this article](https://joker.com/faq/books/jokercom-faq-en/page/adding-name-servers-to-your-domain) on how to do this. ##### 2. Once you've switched, the DNS button will become active (blue) on your [dashboard](https://joker.com/faq/books/jokercom-faq-en/page/understanding-your-dashboard) next to the domain name. Click it: 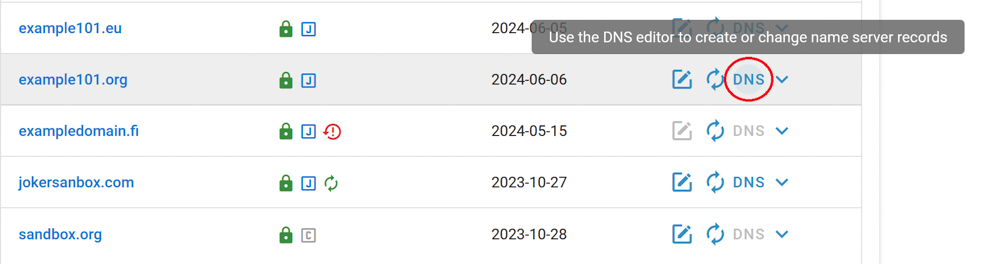 ##### 3. In the DNS configuration section, choose URL Forward as record type: 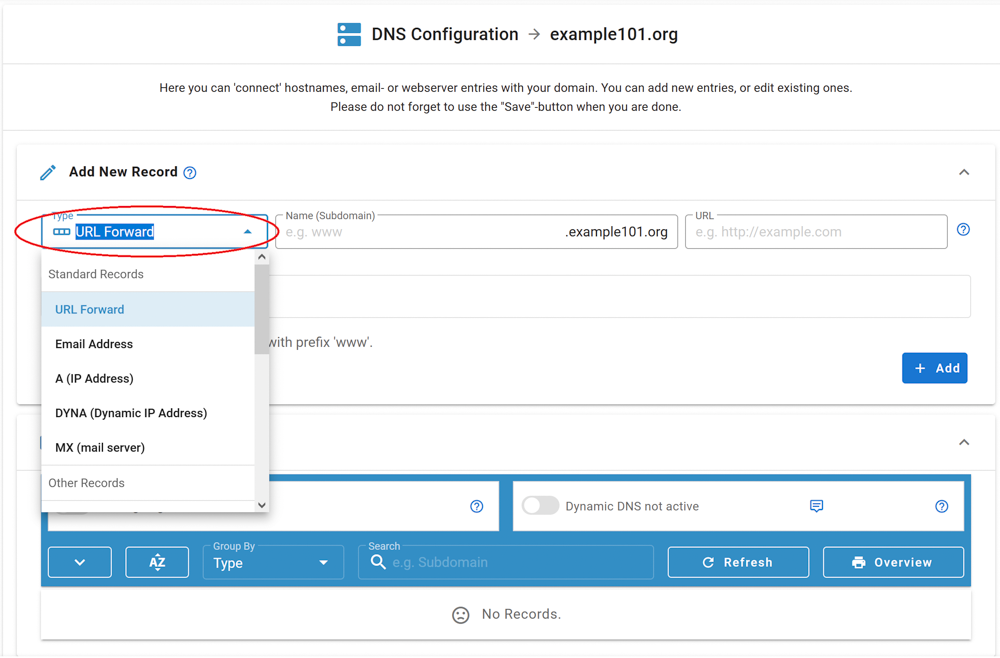 ##### 4. Let's create a URL forwarding for a subdomain "www..." for our domain. Click "add":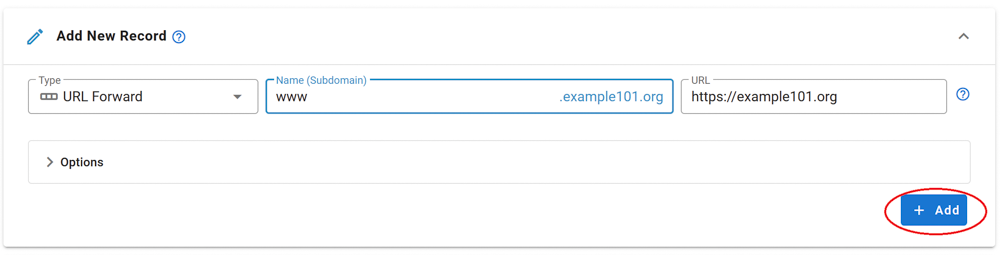 ##### 5. Scroll down to view the newly added record, check its correctness, and click the "Save changes" button: 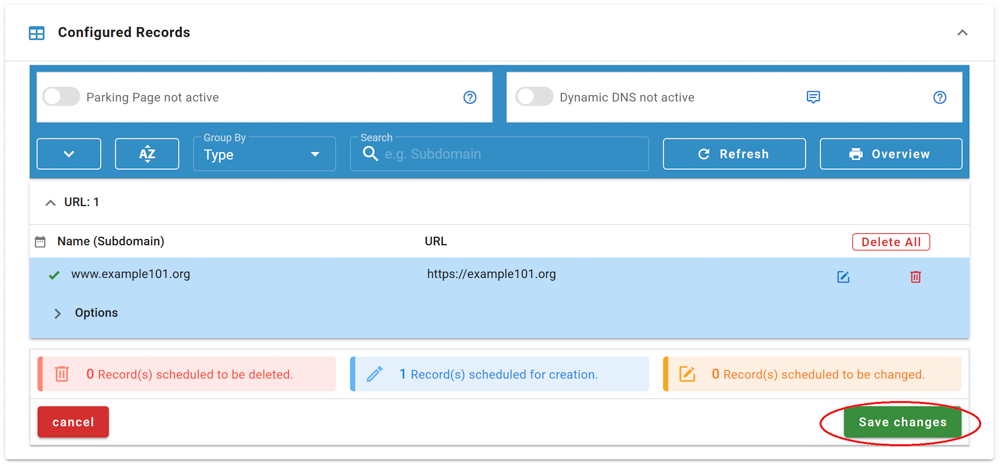 You are done! ## Email Forwarding --- Email Forwarding is a service provided by Joker.com that enables you to create email addresses for a domain and forward incoming emails for those addresses to an external mail account. This means you can have email addresses such as: - info@yourdomain.com - john@yourdomain.com - \*@yourdomain.com These addresses can be forwarded to your email account at your ISP or email provider, such as Gmail, Yahoo, or others.If you create an **Email Forwarding** at Joker.com, an SPF record is **not** created automatically. It is strongly recommended to [**create**](https://joker.com/faq/books/jokercom-faq-en/page/dns-records-supported-by-jokercom-nameservice#bkmrk-how-to-define-spf-re) and [**set up an SPF record**](https://joker.com/faq/books/jokercom-faq-en/page/jokercom-name-service-adding-dns-records#bkmrk-spf-record) for forwards - especially if you forward emails to providers such as Gmail - to ensure proper email delivery.
**Please note the following:** - Email forwarding, similar to URL forwarding, requires that the domain uses the free Joker.com nameservice (which is the default). If you have a domain with a third-party nameservice, you cannot use Joker.com email forwarding. You can easily switch to Joker nameservice, [here you will find the instructions](https://joker.com/faq/books/jokercom-faq-en/page/adding-name-servers-to-your-domain). - To add or modify email addresses for your domains, visit the DNS configuration section by clicking the "DNS" button next to your domain on your [dashboard](https://joker.com/faq/books/jokercom-faq-en/page/understanding-your-dashboard). - Enabling **Email Forwarding will automatically delete current MX records**. This is unavoidable for technical reasons, so you can either let Joker.com handle your email or use a third-party mail server. - **The reverse is also true** - creating an MX record for a (sub-)domain for which an e-mail forwarding already exists **will deactivate it** (a corresponding warning will be displayed beforehand). - For security reasons, we advise against using email forwarding as the "main" email address for your Joker.com account. If this is inadvertently deactivated, you will no longer receive account-related notices. It is also possible to create catch-all addresses. By entering '**\***' instead of *'your\_name'* as the *Email Address:* *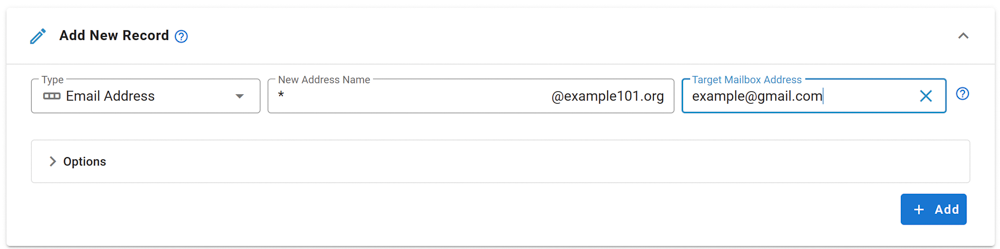* Any emails that **do not match any other address you created** will be directed to the '**\***' entry. **Additionally:** - There is a special account called **'postmaster'** that can be modified but **not deleted.** - You have the option to "**block" specific addresses.** When activated, all incoming emails to the blocked address will be **deleted.** Regarding the number of email addresses per domain, we do not impose strict limits. Instead, we follow a **fair-use policy**. As long as there are no significant *system impacts* caused by an *excessive* number of emails sent or addresses created, there will be no restrictions. *Excessive* in this context refers to significantly above average, and *system impact* refers to significant interference with the general system and/or other users. The current limits are as follows: - Maximum size of a single email: **25MB** - Maximum number of emails per day per address: **400****Important:** When creating a new email address or changing the target address, you need to activate it by responding to the activation email sent to the **Target Email Address**. Simply click on the link provided within the email.
##### What about SPAM?**Please note: The "username" and "password" referred to in this section are not identical to your standard Joker.com credentials.** Instead, when you create your DynDNS entry, you will be provided with special credentials which are only valid for those entries with the specific domain.
## Examples --- ### Hardware Devices / Routers A hardware device like a DSL router often is able to handle Dynamic DNS itself. As an example, this is the corresponding section of a Fritz!Box DSL router: - In the menu (web ui), you have to chose "Preferences" => "Internet" => "Dynamic DNS". - You have to enable "Dynamic DNS" with the checkbox. - Then please choose **"Custom" as the Dynamic DNS Provider**. - The input fields then have to be filled like this: ``` Update-URL: https://svc.joker.com/nic/update?username=**Important:** DNSSEC cannot be fully activated for **.dk domains** directly through the Joker.com interface. To enable DNSSEC for your **.dk domain**, please follow the instructions provided [**HERE**](https://joker.com/faq/books/jokercom-faq-en/page/specific-cctlds-nameservers#bkmrk-adding-dnssec)
## DNSSEC Support at Joker.com Joker.com enables you to activate and configure DNSSEC for nearly all of your domains - most domain types (TLDs) do support DNSSEC. The only exceptions at Joker.com currently are .ws and .cn. **Please note:** Joker.com supports DNSSEC with standard Joker.com name servers as well as with domains that use external name servers - **for Joker.com nameservers:** To enable DNSSEC, please go to click on "DNS" next to your domain on your [dashboard](https://joker.com/faq/books/jokercom-faq-en/page/understanding-your-dashboard). There you will find the "**Enable DNSSEC**" button. If you then click on "**Save changes**", you are done! - **for DNSSEC with own or external name servers:** Please use our instructions below. To find out if your domain is working properly with DNSSEC, you may use the [DNSSEC Analyzer](http://dnssec-debugger.verisignlabs.com/ "DNSSEC Analyzer"). Resellers will find similar commands to operate DNSSEC using **DMAPI** and [**RPanel**](https://rpanel.io). ## How To use DNSSEC with a Joker.com Domain and a DNS Hosting Provider This is about: - you want to use DNSSEC with domains from Joker.com - you are using an **external name service**, like from a service provider, or your own To make this work, the domain has to be "linked" to the external name service: ##### 1. Set up the DNS zone and records at the DNS hosting provider Each DNS hosting provider has its own web interface and system for adding records. Here you have to create the zone records you need, like A records to add IPv4 addresses to a hostname. ##### 2. Still at the DNS hosting provider **sign the domain with DNSSEC**. This of course requires, that your DNS provider support DNSSEC. The end result is that you have a **signed domain with a DS record**. You will need this information (DS record) later at **Joker.com**. ##### 3. At Joker.com [**Change the name servers**](https://joker.com/faq/books/jokercom-faq-en/page/adding-name-servers-to-your-domain#bkmrk-1.-on-your-dashboard) for the domain to point to the name servers of the DNS hosting provider. It should look like this now:  This change may take some time to propagate through the larger DNS infrastructure. Until the name server change has fully propagated, people may still see DNS records coming from the previous name servers. **At this point, you have a domain signed with DNSSEC at the DNS hosting provider, and you have changed the records at Joker.com to point to the name servers of the DNS hosting provider.** Almost done! If you now run your domain through the [**DNSSEC analyzer tool**](https://dnssec-analyzer.verisignlabs.com/ "https://dnssec-analyzer.verisignlabs.com/"), you will still see a problem: "***No DS records found***" This means, you still have to create a so-called ***Delegation Signer (DS)*** record at **Joker.com**. ##### 4. Create DS record at Joker.com - again, visit Joker.com, click "Modify" next to your domain name - You will now find your name servers listed and a DNSSEC section:  - click on '' at section **DNSSEC** - it will then look like this - please check if the information corresponds with what you got in step 2 above:  -Attached files: [hook.sh](https://joker.com/faq/attachments/43) [config.sh](https://joker.com/faq/attachments/42)
# Specific ccTLDs: Nameservers ### .DE-Domains In case you want to **use your own/external name servers** for your .**DE-domains** instead of the standard name servers from Joker.com, you have to make sure that these name servers are compliant with the [requirements set by the DENIC](https://www.denic.de/fileadmin/public/documentation/DENIC-23p.pdf "DENIC DNS requirements"). Requests to register or update **.de domains** are handled by a robot doing the following **checks on the registry side**: - are all name servers given in the request reachable? - are they authoritative? - do their answers contain the "authoritative answer" (AA) bit and do they know about the other authoritative name servers? - are all authoritative nameservers given in the request? - are values in the SOA record*s* in the ranges required by the DENIC? - are the SOA values identical for all name servers? - do at least two of the three name servers differ in the first three bytes of the IP (v4) address? Name Server: SOA Records SOA stands for "**Start of Authority**". An [SOA record](https://en.wikipedia.org/wiki/SOA_Resource_Record "Wikipedia: SOA") is the part of a DNS zone containing the email of the responsible person of the zone, and various synchronization parameters used by the different name servers of the zone. Requests to register or update **.DE domains** must contain SOA values in the following ranges:| **SOA-Record** | **Value** |
| serial recommended format | YYYYMMDDnn |
| refresh | \[10000 ... 86400\] |
| retry | \[1800 ... 28800\] |
| expire | \[604800 ... 3600000\] |
| ttl | \[180 ... 345600\] |
**Important:** If your .dk domain has **never used Joker.com nameservers -** for example, if you just transferred it to us while still using old external/foreign nameservers—you must **create a DNS zone** *before* switching to Joker.com nameservers at **DK Hostmaster (Punktum)**. To activate a zone, simply **create a [virtual zone](https://joker.com/faq/books/jokercom-faq-en/page/new-feature-virtual-zones)** or add **any [DNS record](https://joker.com/faq/books/jokercom-faq-en/page/jokercom-name-service-adding-dns-records)** in the DNS editor (even a placeholder TXT record is sufficient). Once a zone exists, you can successfully update your nameservers at Punktum.
##### Adding DNSSEC **If you use Joker.com nameservers** Activating DNSSEC for your .dk domain is a **two-step process**: 1. **Activate DNSSEC in the Joker.com [DNS Editor](https://joker.com/faq/books/jokercom-faq-en/page/jokercom-name-service-adding-dns-records#bkmrk-2.-once-you%27ve-switc)** - Go to the [**DNS Editor**](https://joker.com/faq/books/jokercom-faq-en/page/jokercom-name-service-adding-dns-records#bkmrk-2.-once-you%27ve-switc) (not the *Modify* section as you would normally do). - Enable the **DNSSEC** switch. - This generates the necessary DNSSEC keys. 2. **Import DS records at DK Hostmaster (Punktum)** - Log in to your account at Punktum. - Open the **DNSSEC** section and choose **“Import DNSSEC keys.”** - Select **all keys**, or at least those using **SHA-256** or **SHA-384**. - Save your changes. Afterwards, verify that everything is functioning correctly using the [DNSSEC Analyzer](https://dnssec-debugger.verisignlabs.com/) **If you use foreign nameservers** The process is similar: 1. **Activate/enable DNSSEC** at your external DNS provider (they will provide the DS records). 2. Go directly to Punktum and **import the DS records** in the DNSSEC management section. 3. **No changes are needed at Joker.com** in this case.**Important:** The **“Import DNSSEC Keys”** page at Punktum does **not work reliably in all browsers**. If the page freezes or shows no error but doesn't proceed, try a different browser. **Microsoft Edge** and **Google Chrome** work consistently.
### .IT-Domains Similar to .de domains, .it domain registry has specific requirements for nameservers. It is crucial to verify the compliance of your custom nameservers before registering an .it domain. If your nameservers do not meet the registry requirements, the domain will be **deleted within 30 days**. To check the compliance of your nameservers, you can use the following link: [https://www.nic.it/en/manage-your-it/dns-check](https://www.nic.it/en/manage-your-it/dns-check).